Friday, April 25, 2008

Using a MiniPOV3 as an AVR programmer


So the Arduino programmer was not that great. AVR programmers are easy to build though, just a handful of zener diodes and resistors and your serial port. Instead of building one, I decided to re-purpose my MiniPOV3.

Doing this is about the same as building one of these. The pinout is easy to remember as an 8-pin AVR's ICSP pins are in the same place. The only thing to do is hook up Vcc, ground and reset.

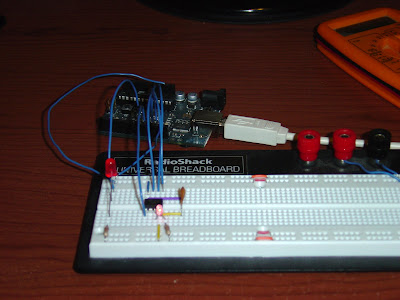
To program the ATtiny13 on the breadboard just ground the jumper on the bottom left. This holds reset down which is required for programming. There's some way to do that through the serial port, but I was too lazy to figure that out. Now all you have to do is power the circuit and fire up an avrdude command like this.

avrdude -p attiny13 -P com2 -c dasa -t

This gave me an avrdude command prompt where I could examine or write flash or eeprom memories. Similarly you could use a -U command like -U flash:w:someprogram.hex. And this will work for every ATmega and ATtiny (or at least I'm pretty sure). I went ahead and ordered one of these anyway though.
Posted by Picasa

Wednesday, April 23, 2008

Using the Arduino as an AVR programmer


I wanted to make an AVR programmer, but since I have almost no experience with AVR programmers beyond the Arduino and MiniPOV3 I thought I'd try something a little more documented. Of course documented doesn't mean non-hackish in anyway. It's also quite ironic that I'm using an Arduino to escape the restrictions I'm trying to avoid on the Arduino.

I found this article which outlines a method for programming AVR microcontrollers using the Arduino. The software only supports a few chips (one luckily being the ATtiny13) but at least it works.

It requires no extra hardware or serial port. The program is streamed to the Arduino over USB then pushed out to the programmed device using SPI. The LED on the left is lit when the programmer is running. The wire going to pin 1 lets the Arduino reset the ATtiny13 for programming, so you don't even have to hold down a reset button. That's good because there's a long (30 second or so) delay while programming. Not too sure what it's doing, but I'm going to move on after this project so I'm not very concerned.

Now that I have this running, I'm going to try to use the MiniPOV3 to program the ATtiny13. If that works, I may stay with that or solder up another small serial programmer. And to think I was going to buy an STK500. My next microcontroller project will be something like this.

Monday, April 21, 2008

μLab up


My brand new (manufactured just 30 years ago) HP5036A microprocessor lab arrived in the mail today. I'm not sure if you can still get machines like this, but it's quite interesting. It runs on an Intel 8085 @ 2MHz, has 1k of SRAM and 2k of ROM. I've already written my first program, a single instruction that writes the contents of the A register to the ouptut LEDs. To change the A register, you can use the monitor (kind of like a debugger) and then run the program again.

Computers these days are hidden behind so many layers of abstraction it's difficult to really play with them at a low level. The address and data busses are clearly marked on the board, you have full access to every peice of hardware and there's no operating system or memory manager to get in the way. Of course there's no communications built in (except for an expansion port) so you have to enter the bytecode by hand. But even for a huge program, that's only 3,000 keystrokes to fill the 1k of RAM.

I know I'll have a lot of fun with this toy as soon as I start digging into the included textbook.
Posted by Picasa